

How To Build A Poker Table With Lights
Introduction on Building Your Own Poker Table
If you've ever been in the market place for a high quality poker table you're well enlightened the cost for fifty-fifty a basic set-up can run you $1,500+. For something customized to your home/infinite or something truly prove-stopping, y'all're looking at twice that or more. It doesn't have to be that manner though. Guest blogger Jeff Kuronen has put together a full step-by-step guide on building your own poker tabular array exclusively for PokerListings.com including images for every stride and detailed CAD plans. Nosotros think it's the perfect Exercise-Information technology-Yourself solution to building a bang-up poker table for under $300 - and in a reasonable amount of time. Once you're done, you're all set to host the weekly card game you've always wanted to. For tips on running the perfect abode game, check our complete 12-part guide here.

Backstory to How I Got Started
Later on constantly called-for through inexpensive playing cards while playing poker with my friends I decided to finally invest in some plastic cards.
While scouring the internet for new cards I came across a peachy local site selling poker supplies. They sell everything from cards to poker tables and building supplies, and it didn't take long for my search to go from cards to on how to build a poker tabular array.
I speedily found out that a higher quality poker table would cost $one,500 or more. The poker table size, at 3.5' 10 8', was never going to fit in my pocket-size basement and I couldn't justify spending that much.
So I decided to build one myself. The final dimensions of this diy poker tabular array are four' x 6' and it seats eight people comfortably.Nigh 25 hours and $300 were spent building it.

What You Need to Build Your Own Poker Table
How to build a poker table is quite elementary functioning only you do demand the right materials for it and some spesific tools which make the overall procedure easier.
Tools:
- Jigsaw
- Drill
- 3-v/8" Pigsty Saw (Y'all can substitute this with a Dremel and a hole jig as a cheaper choice)
- 4" Hole Saw (optional)
- Hole Saw Drill Bit
- Chugalug Sander or Palm Sander
- Needle-Nose Pliers
- Level for tracing lines
- Pencils
- Exacto Knife
- Spiral Driver
- Heavy Duty Stapler
Domicile Depot:
- (2) four'x8'x 5/8" Sheets of plywood (or depending on the poker table dimensions)
- Wood Screws
- Woods Mucilage
- (8) ¼"-20 T-Nuts
- (8) ¼"-xx ten two" Lg. Car Bolts
- (viii) ¼" Washers
- Wood Stain
- Fold-away legs
- Pack of yard Staples
Straight Poker Supplies (www.StraightPokerSupplies.com)
- (8) Jumbo Loving cup Holders
- Copag Elite Playing Cards (optional – highly recommended)
Your Car Trim (www.YourAutoTrim.com)
- (3 yds) Whisper Vinyl
- (3 yds) Poker Speed Cloth (for high quality poker table meridian)
Cream By Mail service (www.FoamByMail.com)
- (half-dozen Ft) 2Lb Charcoal Volara Cream, ¼" ten 60"
- (i Sheet) Lux Regular Foam, 82"x76"x1"
Sentry the video below to see how to build a poker tabular array and keep reading the post for the full written-out, pace-by-pace instructions from the video:
How to Build Your Poker Table
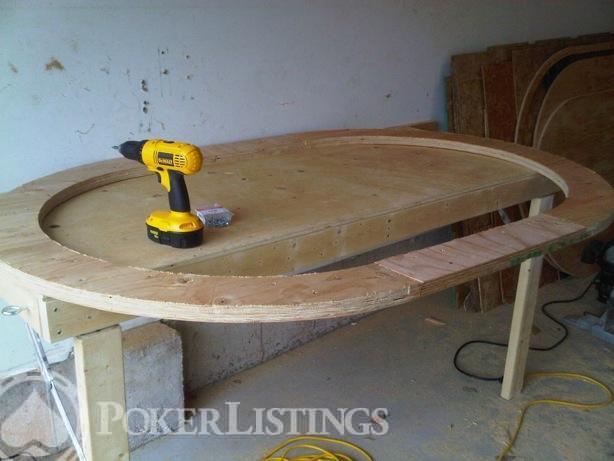
Commencement, I traced out all the cut lines on both sheets of plywood.
After all my cutting lines were laid out, I created a jig out of some flake wood to guide my jigsaw in a perfect circle through the round cuts.
This process went horribly. Exercise Not endeavour the same affair.
After messing around with information technology for about an hour I was forced to admit defeat. I took a modest break and played online poker earlier continuing.
I ended up going really slowly with the jigsaw by hand and so sanding the edges smooth with a belt sander. When edifice a custom poker table, a lot of imperfections will be subconscious by the thick foam layer then it doesn't have to be perfect.
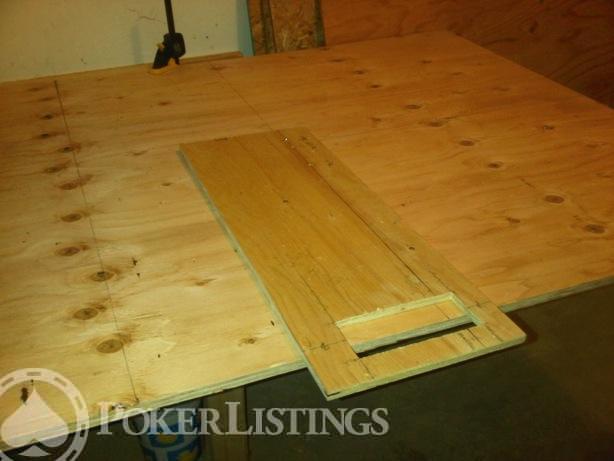
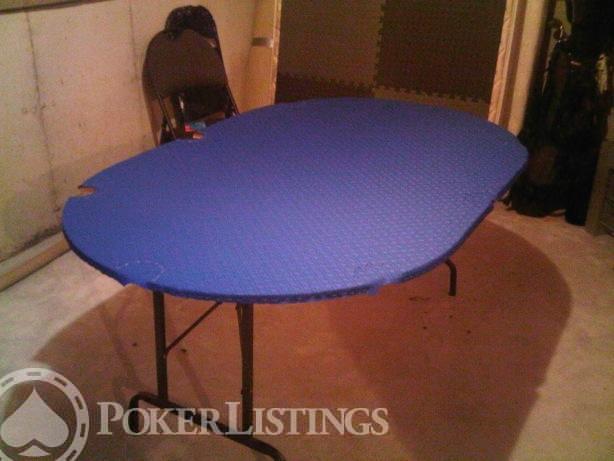
Here's a movie of the commencement few finished plywood pieces. These 3 pieces were all cut from a single plywood sail.
The adjacent step is gluing and screwing all the rail pieces together, making sure to avoid putting screws in spots where the future cup holders will go.
Screw from the bottom surface of the rail - the custom poker table top surface should be every bit consequent and smooth as possible. Use wood filler if at that place are whatever holes from knots.
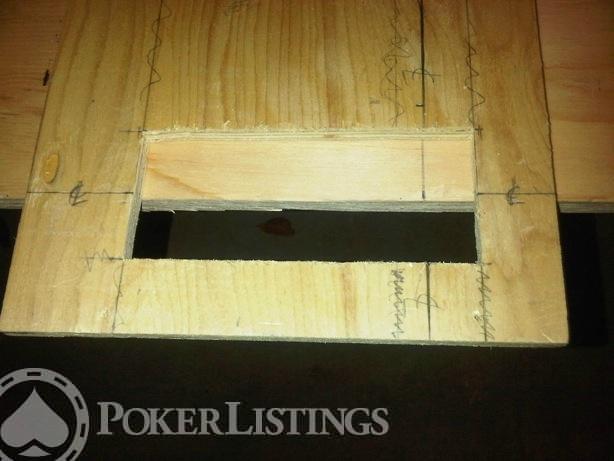
There are three layers of plywood in this design to requite the rail extra elevation. The first two assembled layers are shown hither upside down – the pinnacle surface should be the single plywood piece.
Hither's the bottom view with the third, thinner layer attached.
The bottom layer is used to position the rail on the playing surface.

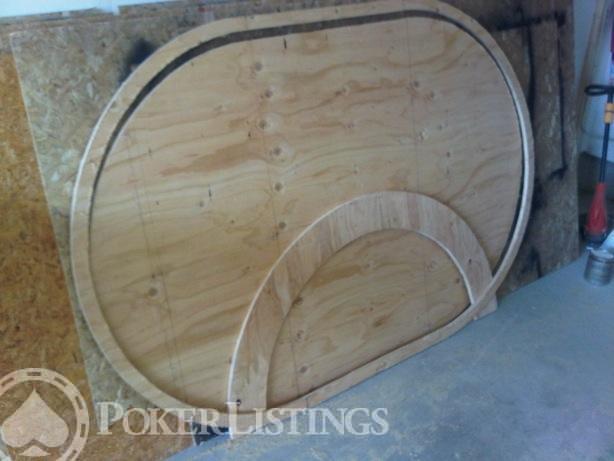
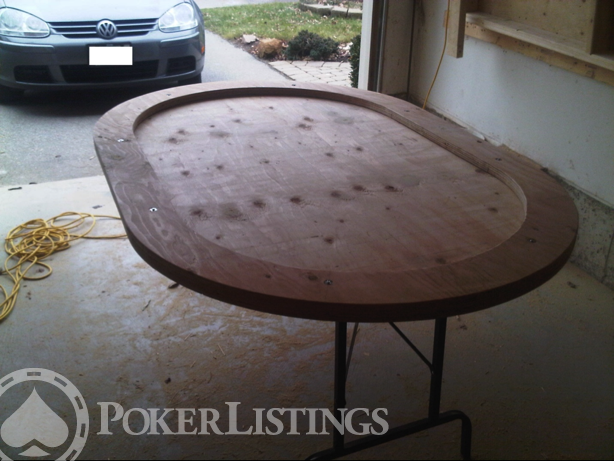
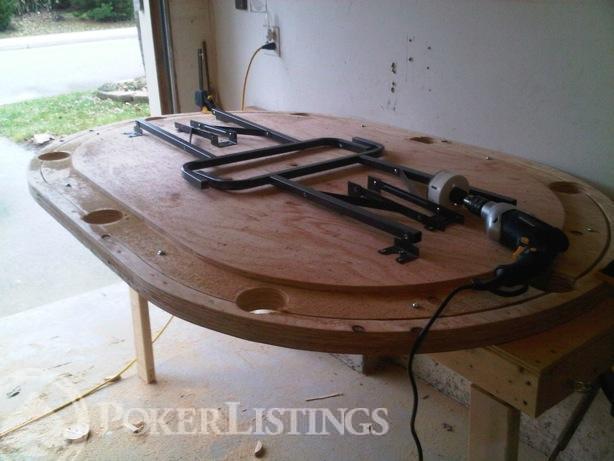
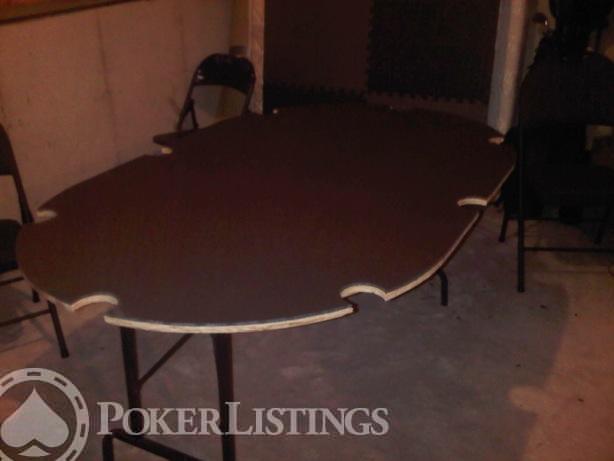
Next, the two oval plywood sheets are glued and screwed together and the fold-out legs are added.
If you lot want to stain the underside of the tabular array, yous should do it before attaching the legs. I didn't stain mine because most people won't see the bottom.
If y'all desire to be a bit fancier install wooden legs instead. I personally needed the portability and this finished table weighs roughly 80lbs. Here's a quick look at the rough assembly:

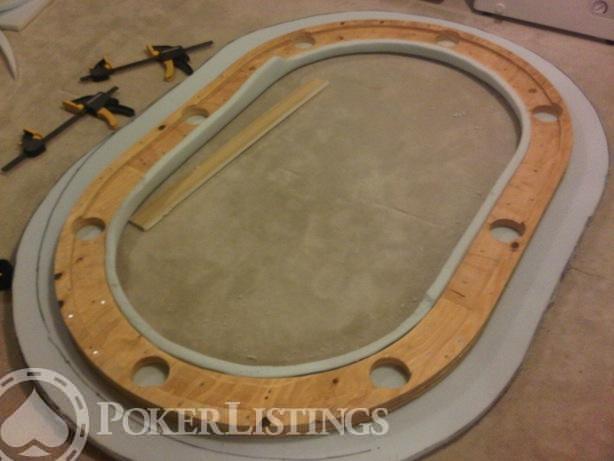
Clamp the crude associates together to drill the holes for the T-basics. This is washed and then that the rail tin be removed for cleaning or in case something needs to exist replaced (potentially the poker speed cloth).
Employ a hammer to bulldoze the T-nuts into the rail surface. This needs to exist flush; otherwise you may accept bumps nether your rail.
In one case the T-nuts are installed, fasten the assembled rail to the playing surface using the viii automobile bolts coupled with the washers.
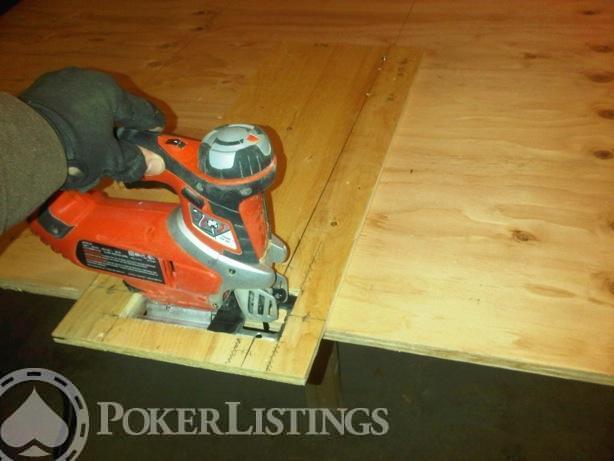
Drill the 3-5/8" holes for the cup holders while the table is fastened in this assembly.
Hither'due south a view from the bottom with the holes cutting out:
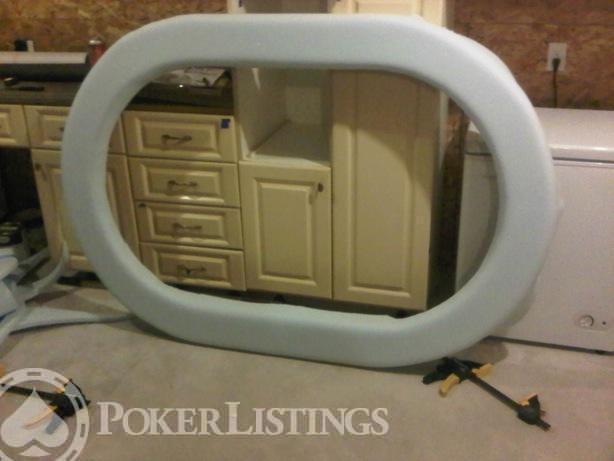
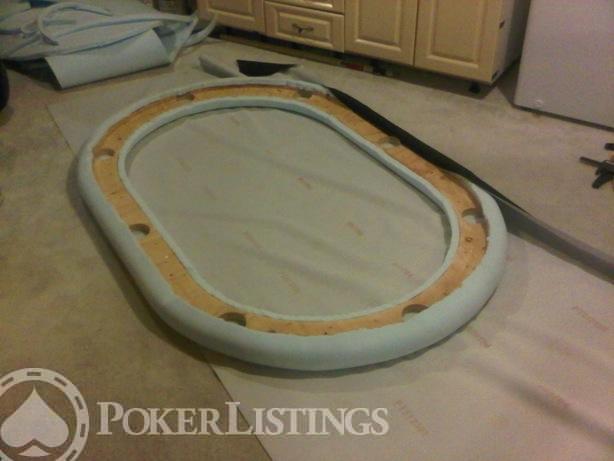
At present the piece of cake part is finished and it'south time to add together foam and upholster the rail. Remove the rails associates from the table.
Lay the 1" foam on the ground, spray the top of the rail with spray adhesive and fix the rail on the cream making sure to get out enough room then that you tin can wrap the foam around the rail.
Leave it like this for an hour with a few heavy objects on top. Make some rough cuts in the foam to brand it workable.
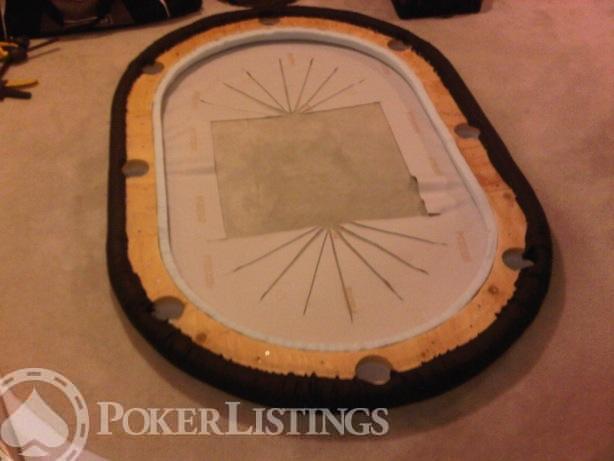
Use the spray adhesive again on the sides of the runway and wrap information technology like shown. You may desire to clamp the directly sides using a flake slice of wood to hold information technology while information technology dries.
Practice the same for the exterior and and so trim the backlog cream.
You may accept to re-apply spray adhesive more than than once because it may peel off the track in a few places.
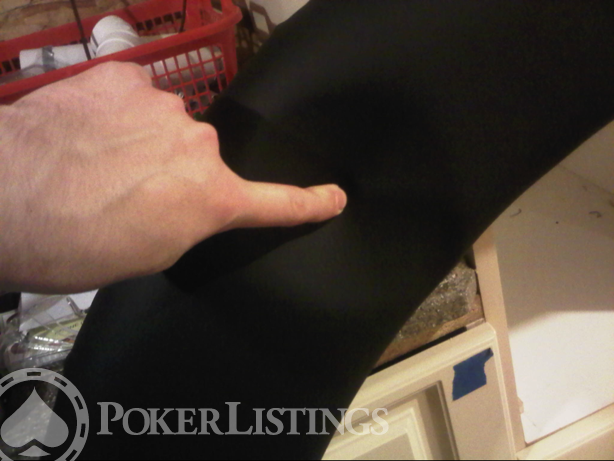
Cut out the foam where the cup holders are going to be placed. Use a sharp pocketknife.
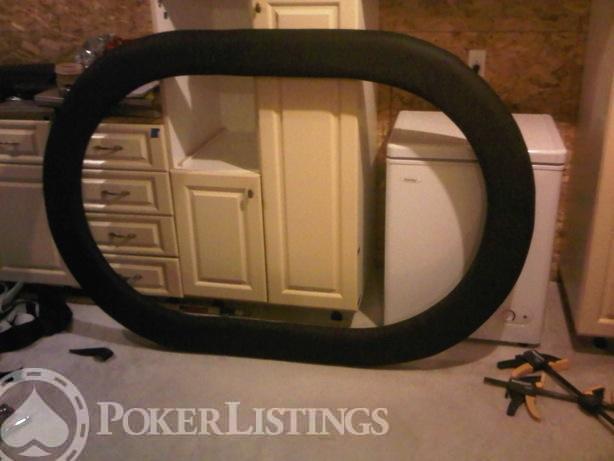
Adjacent up is the vinyl. Start by stapling one direct border.
You're going to demand a lot of staples for this footstep; probably effectually 400-500.
Your hands may injure for a few days afterwards from all the stapling but it is well worth the attempt.
You lot tin can see that the vinyl is not long enough to go to the other side in the film above.
This may seem to be a problem at outset merely you will need to stretch the vinyl with all your strength to get it all the manner around the other side.
Yous may want a friend to help you with that to make it easier.
After you lot staple the straight edges you need to staple the round edges. Start stapling at the middle of the curve.
Make certain you lot stretch the vinyl to make information technology equally tight every bit you lot can. Each new staple should exist placed in the heart of the largest unstapled section until you feel as if you accept it all secured.
This will most likely require staples to exist very close to each other. This is very time consuming and yous will want some pliers and a screwdriver to remove staples when sections don't wait correct.
Don't be discouraged here. Take your time with this because this is the most important step to make your table look nifty.
The vinyl volition inevitably bunch up a little here simply virtually should be hidden underneath the tabular array.

The next footstep is to cutting the centre of the vinyl like is shown in the film below.
Don't cut besides close to the edges at start.
You can ever cutting more if needed as y'all test out this process.
Start stapling the straight department first and then work on the curved parts next.
Call back to e'er pull very hard when stapling.
Like before, on the curved department, each staple should exist placed in the middle of the largest unstapled section until you feel as if you have information technology all secured.
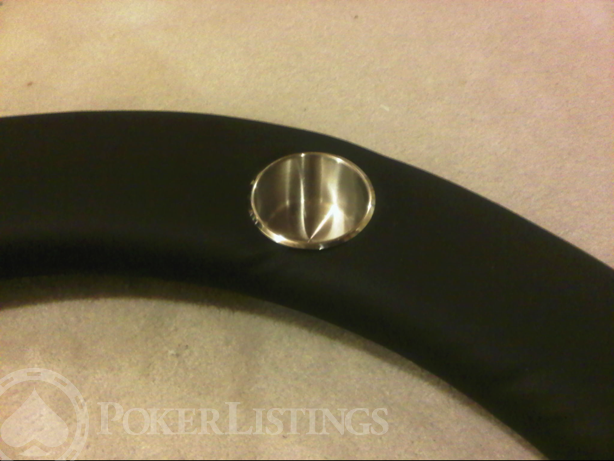
Now it's fourth dimension for the near terrifying office of the chore - cutting the holes for the cup holders.
Be careful. Cut an "X" shape in the middle of the holes.
Start small-scale as you can e'er make the cuts larger later. Test out the holes using the cup holders.
If it goes in snugly then you've done it right.
Although it's non shown here and is an optional step, in that location are thin wood rings that were cutting using the 3-5/8" and iv" hole saws assembled together on the hole saw drill bit.
This woods ring helps support the loving cup holder and go on it level when a heavy beverage is placed in it.
Put the wood rings into the rails under the vinyl before putting the cup holders in identify. They should skid into the "X" cuts easily.

The hardest part of the poker tabular array plans is now finished! Information technology's all easy from hither on out.
On to the playing surface. Spray the tabular array top with the adhesive and centre the ¼" foam.
You definitely want this foam – don't skimp here every bit it adds some requite in your table surface that will brand playing more comfortable.
One time the foam is attached, cut the backlog fabric off.
Side by side you need to staple the speed cloth over the table. Center the cloth over the tabular array.
Staple the edges and the cup holder cutouts to secure the cloth.
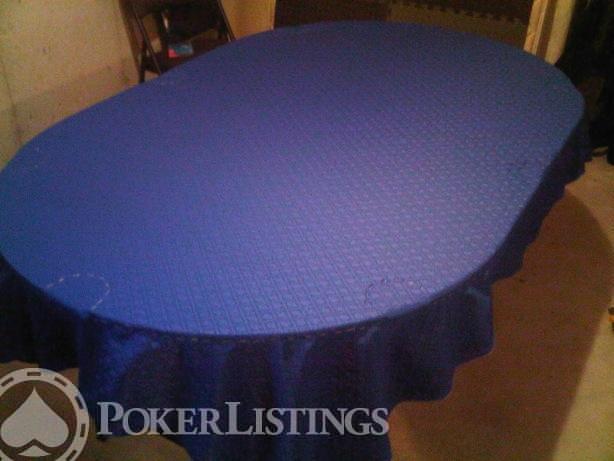
Trim the excess material around the edges and within the cup holder cutouts.
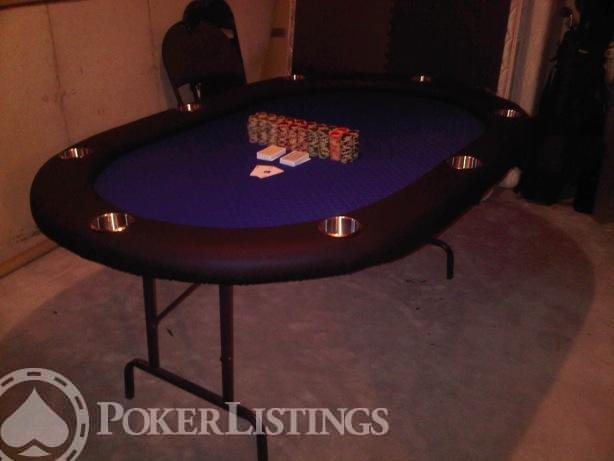
Attach the rail to the playing surface using the 8 machine bolts coupled with the washers from the bottom of the runway and you are done.
It's time to have a game and a few drinks.
Complete CAD Blueprints for the DIY Poker Table
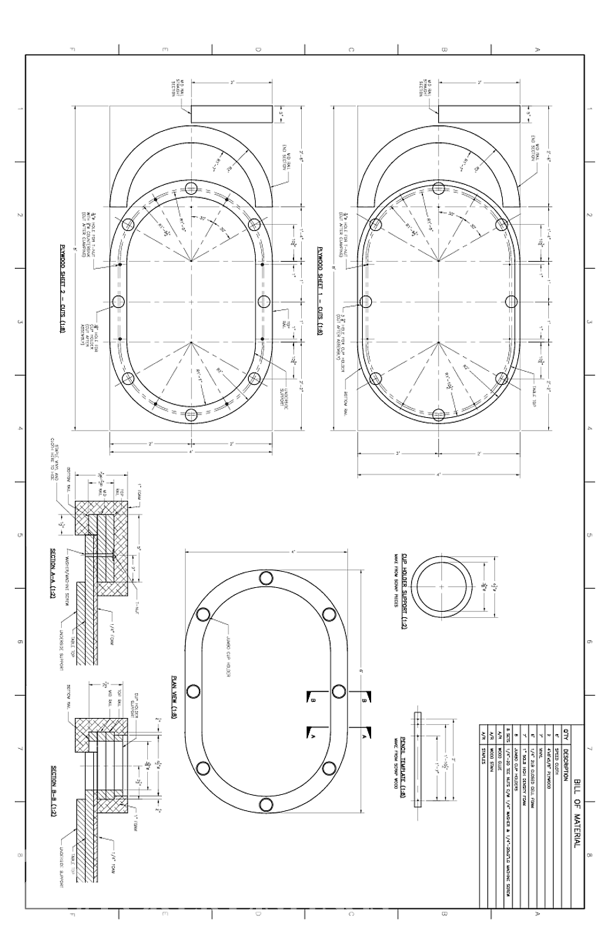

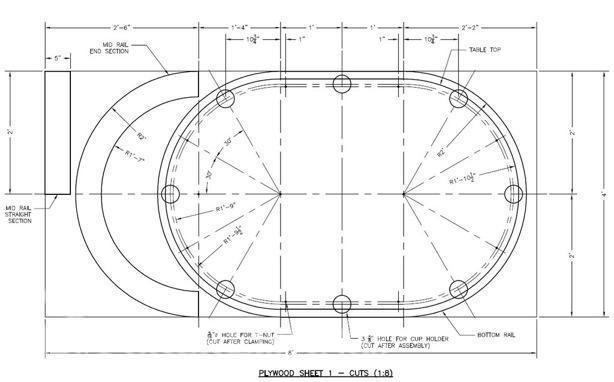


Click here for the full-size PDF of the CAD plans.
DIY Poker Table - Stride-by-Pace Instructions
Here you detect simple step-past-stride instructions on how to build a poker table from get-go to finish.
1. Rounding the Corners
- Have two sheets of plywood (42" X 84" cut at store). Mark "Sheet A" and "Sheet B".
- Identify Sheet A on sawhorses.
- Mensurate 21" in from end and mark.
- Measure out 21" from side and marker.
- Extend marks to make an Ten and drive nail into center point.
- Repeat process on other end of Canvass A.
- Have flake wood and make marks at one" and 22".
- Drill holes at marks large enough for nail and tip of pencil to laissez passer through.
- Place first hole in scrap woods over nail.
- Insert pencil through second pigsty and trace curves.
- Repeat at other end of Canvas A.
- Use jigsaw to cut off corners.
- Use palm sander to polish curves.
two. Cutting the Rail
- On the scrap forest guide, mark 17" and drill hole.
- Use guide to trace curves five" from edge of Sheet A.
- Utilise straight-border to extend lines along length of sheet.
- Drill hole to showtime the cut.
- Insert jigsaw blade into pilot pigsty and begin the cutting.
- After 2' of cutting, pause and use scrap wood and clamp to support rail.
- Continue cutting, clamping a second support opposite the first.
- Complete the cutting, remove clamps and remove both Sheet A pieces from sawhorses.
3. Cutting Rail Support and Tabular array-Top
- Place Sail B on sawhorses and utilize outer piece from Sheet A to trace curves.
- Use jigsaw to cut off corners.
- Measure 21" in from end and mark.
- Measure 21" from side and mark.
- Extend marks to make an X and drive blast into center point.
- Repeat process on other end of Sheet B.
- On scrap wood guide, marker 20.five" and drill hole.
- Trace curves i.5" from edge of Sheet B and utilize straight-border to extend lines.
- Drill pigsty to starting time cut and use jigsaw to cutting out runway support, clamping supports as before.
4. Gum and Screw Tabular array-Top
- Place inner piece from Sheet B on sawhorses.
- Apply wood mucilage beyond surface leaving at least 5" effectually edge gum-free.
- Place inner piece from Sheet A on Sheet B, measuring 3.v" in on all sides to center.
- Spiral down, ensuring all spiral heads are flush with or beneath surface.
five. Glue and Screw Rail
- Place outer slice from Sheet A on table.
- Run bead of glue around outer ane.5".
- Ensure pieces are matched according to position used to trace curves in stride 3.one.
- Place outer slice from Sheet B, aligned with outer edge.
- Screw runway back up onto rail, aligning outer edges as you go.
- Utilize palm sander to remove discrepancies in outer border.
- Apply router and roundover bit to round top and lesser of outer-border and elevation within-edge of runway.
6. Install Motorcar Bolts in Rail
- Remove rail assembly and flip over table-pinnacle.
- Use palm sander to remove fabric from outer edge of tabular array-summit to allow meliorate fit for rail.
- Identify rail on table-height and clench in place.
- Drill eight every bit-spaced 3/viii" holes through track and table-top, 2" from inside edge.
- Employ forstner bit to remove plenty material for bolt head to sit flush with top of rail.
- Remove track and hammer machine bolts through holes in runway.
- Aggrandize holes in table to 1/2" by drilling new hole with 1/2" bit.
seven. Applying Cream to Table-Top
- Ensure space is well-ventilated or utilise ventilator.
- Ensure table-top is gratuitous of dust and droppings.
- Place one/4" foam centered on table-pinnacle and weight downwardly i side.
- Curl up foam, apply spray adhesive to table acme, unroll cream and press down.
- Remove weight and use adhesive to remaining table/foam.
- Allow recommended time to dry.
- Employ pocketknife to cut foam flush with outer edge of tabular array-elevation.
8. Applying Speed Material to Table-Peak
- Lay speed textile face up-down on a protected surface (carpet).
- Place table top face-down, centered on speed cloth.
- Starting with directly edges, pull cloth tight and staple to bottom of table-meridian.
- Trim backlog speed cloth.
- Install folding legs.
9. Applying Foam to Rail
- Lay out i" foam pieces and place rail face-down on cream.
- Trim cream ii" larger than rail on exterior and 1" on inside.
- Identify runway face-upwards on table.
- Spray adhesive on meridian and outer edges of rail and apply 1" cream.
- Cutting cream flush with bottom inner and outer edges.
x. Applying Vinyl to Track
- Lay out vinyl confront down on protected surface.
- Place rail cream-side downward on vinyl.
- Starting with straight sides, stretch and staple vinyl to bottom of rail support.
- Go along around curved ends.
- Cut out vinyl 5" in from inner edge of rail.
- Brand relief cuts in the vinyl starting 2" off inner edge of curves.
- Stretch and staple the vinyl around inside edge of rail.
11. Installing Rail
- Locate bolt holes in table top.
- Place square of duct tape over pigsty and cut pocket-sized 10 in tape, speed cloth and foam for commodities.
- Repeat on undersides of holes.
- Position rail on table-top with bolts passing through holes.
- Install nuts to secure runway to table-summit.
Bootleg Poker Table - Summary
When making a homemade poker tabular array, the hardest office for me was cut all the pieces and fitting them to match the exact dimensions. Adjacent was the surface stop, which was very fourth dimension consuming in social club to get that high quality look. Consider using materials y'all can gild from the sites listed on the poker table plans above and you can take that high quality look with a price lower than cheap poker tables - under $300. Good materials too make the most time-consuming part easier, since they do non tear as easily as some bottom materials. Official poker rules exercise accept certain gear up dimensions for the poker table size, but in the stop my bootleg poker table worked perfectly and also upgraded my poker nights exponentially.
Building a poker table is a nice project and very piece of cake, especially now that y'all take complete poker tabular array plans pdf. All the same, at that place were moments, I wished I had extra hand or two while building it. And then, if yous have friend or two who are eager to practise something cool, get them onboard and practise it together! That's well-nigh it. Just follow the detailed step-by-step instructions, take your fourth dimension, and soon you will be hosting that perfect poker dark or poker tournaments at your own poker table.
Source: https://www.pokerlistings.com/how-to-build-your-own-poker-table-for-under-300-guide-images-and-plans
0 Response to "How To Build A Poker Table With Lights"
Post a Comment